
Welcome to TutorBird!
You’re here because you’re ready to take the plunge and get set up with the #1 tutor management software for private tutors. You may have been referred by a friend who uses TutorBird. Or maybe you read about us on social media. However you found us, we’re happy you’re here!
This is the first step in taking your business admin to the next level. Right now, you might be feeling:
- Excited – “Just think of all the time I’ll save!”
- Overwhelmed – “Where should I start?”
- Hungry – “Who has time to eat in between lessons?!”
- Or a combination of all 3!

This Getting Started Guide will help you understand the ins and outs of TutorBird so you’ll be ready to dive in. So grab a snack, get comfy, and get started!
Only have 10 minutes?
Watch our demo video to see TutorBird in action
An hour in between lessons?
Just explore The Basics! Learn about student management and calendar-based billing
The whole afternoon?
Read the full Getting Started Guide. When you’re done, follow along with our step by step support articles
What is TutorBird?

TutorBird is a web-based application that uses the cloud.
Or in more human terms: It’s a platform you can access on any device connected to the Internet and always have your most up to date information.
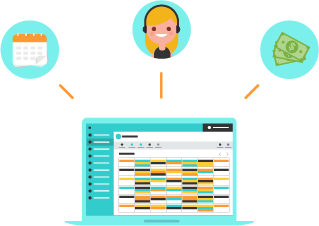
At its core, TutorBird helps you manage your students, schedule, billing, and invoicing – but there’s so much more beyond that! Once you get familiar with the basics, you can explore the other features we have to offer. If you look at TutorBird and start to feel overwhelmed, remember – every feature is completely optional!


Now let’s get started…
The Basics
If you’re used to using a variety of documents and spreadsheets and notebooks (oh my!) to organize your students and schedule, it’s going to be a change to switch your thinking to an all-in-one system like TutorBird. In order to understand how to streamline your processes, you need to understand how your students, calendar, and finances work together. TutorBird uses what’s called calendar-based billing.
Calendar-Based Billing
1. A system of automatically calculating money owed by using the student’s lesson price and scheduled events
2. The answer to all of your invoicing woes
e.g. Thanks to TutorBird’s calendar-based billing, I save so many hours each month on tedious admin work that I’ve had time to watch all of Netflix! (Seriously, all of it!)

Gone are the days of manually adding up the number of math lessons Eric has booked next month – let the system do it for you! It’s as easy as 1-2-3.
1. Add your student’s details to TutorBird. This is where you tell the system how much you want to charge them for their lessons (per lesson rate, flat monthly rate, or hourly rate).
2. Schedule your student on the calendar. At the time of their lesson, you’ll take attendance. This is how you tell the system when the student attends lessons. These charges will automatically be added to the student’s Family Account.
3. Now you have a running balance showing what they owe for their lessons. With just a few clicks, you can generate a professional invoice and send it to the family for payment.
We promise – it really is that easy! Let’s break each step down further:

Step 1:
Students
Whether you’re a private tutor or a multi-tutor business, your first step is adding your students. The only required fields are the student’s first and last name, and their parent/guardian’s first and last name. Every other field is optional. Like all other features of TutorBird, you can add as much or as little as you need. When adding your students, you’ll also set their default lesson price and length.
Tip: If you already have a spreadsheet of existing students, you can use our handy import tool!
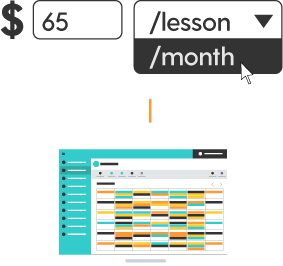
Default lesson price?
Wait – what does that mean?!
Each of your students can have a unique student-tutor billing relationship. That means every student can be charged differently, and if you have a multi-tutor business, they can even have a different price for each tutor they take lessons with. There are three different billing types in TutorBird:
1. Per lesson – A charge is generated for each individual lesson scheduled
e.g. Eric is charged $50/lesson. His weekly Thursday lessons will each add $50 to his account.
2. Per month – A single charge is generated for the month if there is at least one lesson scheduled
e.g. Eric is charged $125/month. A charge of $125 will be added to his account on June 1st, regardless of whether he has one lesson scheduled or ten.
3. Hourly – A charge is calculated based on the length of the lesson
e.g. Eric is charged $80/hour. He is scheduled for a 30-minute lesson this week. A charge of $40 will be added to his account (half of the hourly price).
Step 2:
Calendar
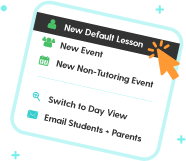
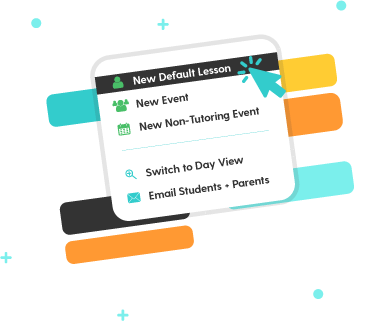
Your next step is setting up your calendar. For the majority of your students, you’ll likely be setting up a single lesson time that repeats each week at the same time. TutorBird makes it easy! The default lesson price and length you set up for each student in the last step creates a shortcut to scheduling their lesson. Click the day you want to schedule the first lesson on, and select New Default Lesson. The system will already know how long the lesson needs to be, and how much the student will be charged for it. Fill in any remaining details and whether you want it to repeat – and that’s it! You’ll see their newly scheduled lessons populate on the calendar.
Does this mean students can only be scheduled at their default lesson price and length?
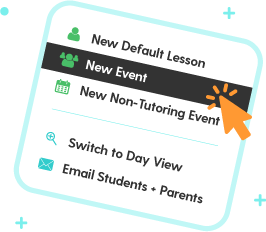
Nope! For any lessons or events where you don’t want to use the defaults, click the day on the calendar and select New Event instead. You can set the length, price and attendees yourself – or use it to create an open lesson slot!

Categories – You can organize the events on your calendar by creating custom categories. Each category can have its own name, color, automated reminder settings, and more! Using categories is a great way to keep a visual separation on your schedule between private lessons, group sessions, workshops, vacation days, and any other events you’re running. Set your Calendar Preferences to color code by category to see your different event colors on display!
Locations – Another way to keep your events organized is by using custom locations! You can set up in-person lesson locations using the student’s home address in their profile, or by specifying an address. Clicking on the location from the event in the calendar will even open up directions on a map! For online lessons, you can set the location to Zoom, Skype, or FaceTime. If a lesson’s location is set to Zoom, it will automatically display the link in the tutor’s profile. For Skype or FaceTime, it will display the student’s username from their profile. Easy, one-click access to join or start the online lesson!

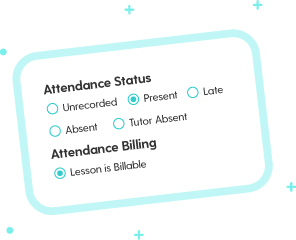
When the lesson time comes around you can take attendance directly from the calendar or on your Home Agenda. There’s an attendance option for every situation – don’t worry, we thought of everything. When taking attendance, you’ll first set the status. Then, depending on the status you select, you can set one of the billing options.
When taking attendance for a group lesson, you’ll take the attendance for the exceptions first. For example, if you have 3 students in a group of 10 who are being marked Absent, you’ll save their individual attendance statuses. Then, under the group attendance you can set the rest of them as Present. When you click Save, you’ll be prompted to save the attendance status for the students who are currently set as Unrecorded Only or to Overwrite All.
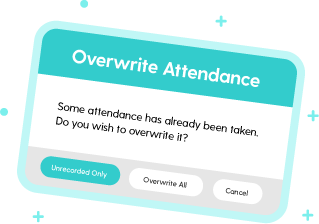

Unrecorded – This is the default option. It means you have yet to take attendance. This will count as a billable lesson.
Present, Lesson is Billable – Well, this one’s pretty straight forward. Your student was present for their lesson and will be billed!

Absent, Notice Given – Your student will NOT be attending this lesson, but they did give you enough notice. They won’t be billed for this lesson.
Absent, Absence is Billable – Your student will NOT be attending this lesson, they didn’t give you enough notice, AND you’re not going to be making it up at a later date. They will still be billed (your time is more than worth it!).

Tutor Absent, Bill & Give Make-Up Credit – You have to cancel today’s lesson – it happens sometimes! Your student will still be billed for today, but they’ll be able to make it up at a later date at no additional charge. (Fellow Canadians, you might need this option for snow day closures!)
Tutor Absent, Not Billable – You have to cancel, and you’re not going to bill your student for the lesson.

Offer make-up lessons at your business? For any lesson categories that allow make-ups, you’ll also see the following attendance options:
Present or Late, Use Make-Up Credit – Choose this option if your student earned a make-up credit from a previously cancelled class and is now making that lesson up. They will NOT be billed for this lesson, because they were billed for the previously cancelled lesson.
Absent, Bill & Give Make-Up Credit – Your student will NOT be attending the lesson, but will make it up at a later date. This lesson will be billed.
Absent, Use Make-Up Credit – Your student will NOT be attending this lesson, and you will be using a make-up credit they previously earned.
On the topic of make-up credits…
If your business offers make-ups for missed lessons, TutorBird has a number of features to help you out! Make-up credits can be enabled on a category basis. That means for each lesson category you have the option of allowing make-up credits to be earned by looking at your student list:
- Go to the Students menu
- Select Make-up Credits and Make-up Credits (Unscheduled) from the drop-down
Make-up Credits = How many credits the student currently has on their account
Make-up Credits (Unscheduled) = How many credits the student currently has that have not already been scheduled for an upcoming make-up lesson


Step 3:
Accounts & Invoices
Finally, you’ll see how calendar-based billing all comes together by going to Families & Invoices. Every one of your students has a Family Account. If multiple family members are students they’ll be grouped into one Family Account to make it even more streamlined. This is where you’ll find the charges that have been generated from the calendar. In each Family Account, you’ll see an itemized list of transactions and a running balance of how much they owe you.
W T F(inance)
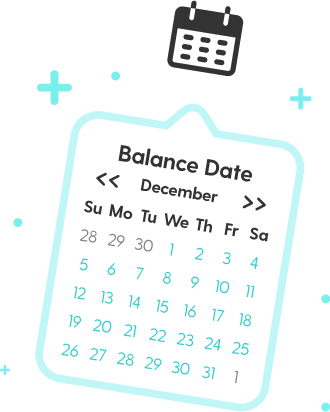
is a balance date?
That little calendar button at the top of a Family Account adjusts the balance date. The balance date tells you the date you’re viewing transactions up to. You can change this at any time to peek ahead at upcoming transactions or go back to view previous balances. This comes in really handy when you want to double-check that families have been charged accordingly.
e.g. Eric’s dad wants to know how much his upcoming invoice will be for since his lesson price has increased, and there are additional fees for his exam prep books. All you need to do is change the balance date to the end of the next invoice period and you’ll see the total charges that will be included.
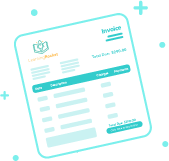
Anatomy of an Invoice
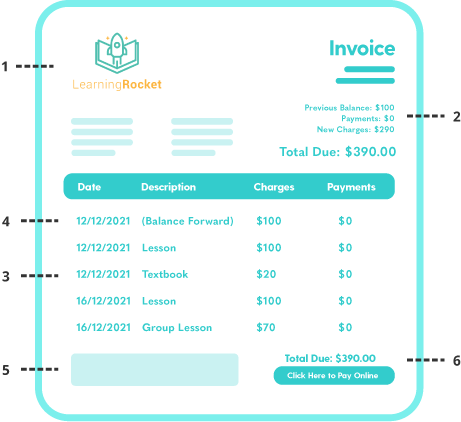
When you’re ready to collect your money, create a simple, professional invoice in just a few clicks. Then send it off to your families and wait for your bank account balance to go up!
1. Business Logo & Accent Color – Customize your invoice to match your brand. Not a graphic designer? Not a problem! Choose from several available stock logos.
2. Invoice Summary – At a glance, easily see the invoice date, previous balance, new charges, and total amount due.
3. List of Transactions – An invoice is a snapshot of the Family Account at the time it was created. It will include all transactions that were in the Family Account between the dates you’ve created your invoice for. The invoice is a static document, meaning if you make changes in the Family Account (i.e. adding or removing charges) the invoice will not automatically update.
4. Balance Forward – If this family still owes money on a previous invoice, they won’t be able to get away with it! Any overdue amount will be included in the balance forward.
5. Invoice Footer – Important details you need to share about payments or reminders about business policies? This is the perfect spot for can’t-miss information!
6. Total and Online Payment button – At the bottom of your invoice will be a very clear total amount due. If you have online payments set up (more on that here) your invoices will also have an online payment button to take parents right to the payment page – aka no excuses for not paying on time!

Top Troubleshooting Tip
Billing can be a real headache, especially if you’ve been calculating balances manually. Our top tip for avoiding any billing mishaps is to trust the system. Let calendar-based billing work its magic – in most cases, you don’t need to intervene with manual charges for lesson payments. If it looks like a student has duplicate charges in their Family Account, you can easily tell which ones are generated by the calendar and which ones you may have manually added yourself. Just look for an icon to the left of the charge.

You’ve made it through The Basics!
If you’re eager to dive in, start adding your students to your account. Or keep reading to find out how to take what you’ve learned here and Automate It!